Appearance
Install Zal Ultra ISP CRM On Your VPS
This comprehensive guide will walk you through the process of installing Zal Ultra ISP CRM on your own VPS server. Our automated installation script handles everything - you just need a fresh Ubuntu server with OpenSSH installed, and we'll take care of the rest!
Prerequisites
Server Requirements
- OS: Ubuntu 24.04 LTS (Fresh Installation)
- RAM: Minimum 4GB (8GB recommended for production)
- CPU: 2+ Cores (4+ recommended for production)
- Storage: 50GB+ SSD (100GB+ recommended for production)
- Access: Root/Sudo privileges
- Network: Static IP address or domain name
What You Need to Prepare
Only OpenSSH Server is required! Our automated installation script will install and configure everything else:
✅ Web Server: Nginx
✅ PHP: PHP 8.x with FPM
✅ Database: MySQL/MariaDB
✅ RADIUS: FreeRADIUS 3.x
✅ SSL: SSL/TLS certificates
✅ Process Manager: Supervisor
✅ Cache: Redis
✅ Real-time: WebSocket server
✅ Dependencies: All required PHP extensions and system packages
Important: Zal Ultra is specifically optimized for Ubuntu 24.04 LTS. Using any other OS version may cause compatibility issues.
Trial vs Production License
🆓 Trial Version
After installation, you'll have access to a fully functional trial version with the following features:
- ✅ 500 Subscriber Limit: Add up to 500 subscribers
- ✅ All Features Available: Test all Zal Ultra features
- ✅ No Time Limit: Use trial version as long as needed
- ✅ Full Functionality: Everything works without any issues
- ✅ Perfect for Testing: Evaluate before purchasing
💎 Production License (Paid)
For production use with higher subscriber limits, you need to:
- Purchase License: Buy from portal.onezeroart.com
- Update Server: Run update script with license key
- Activate Software: Complete license verification
- 100% Production Ready: Full support and production features
Available License Plans:
- ✅ 500 Subscribers
- ✅ 1,000 Subscribers
- ✅ 2,000 Subscribers
- ✅ 5,000 Subscribers
- ✅ 10,000 Subscribers
- ✅ 20,000 Subscribers
- ✅ 50,000 Subscribers
- ✅ 100,000 Subscribers
- ✅ 200,000 Subscribers
- ✅ 300,000 Subscribers
- ✅ 500,000 Subscribers
Benefits of Paid License:
- ✅ Higher subscriber capacity based on your plan
- ✅ Priority 24/7 support
- ✅ Regular updates and security patches
- ✅ Production-ready configuration
- ✅ Commercial use allowed
- ✅ White-label options available
Installation Process
Connect to your server via SSH and execute the following commands in sequence. The automated script will handle all installations and configurations.
Switch to Root User
bash
sudo -iThis command switches to the root user mode, which is required for the installation process.
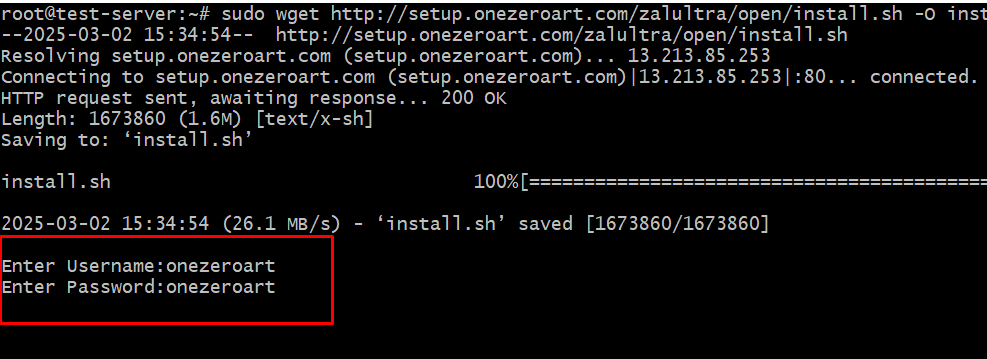
Copy & Run The Installation Script
bash
sudo wget http://setup.onezeroart.com/zalultra/open/install.sh -O install.sh && bash install.sh && history -cwThis command downloads and executes the Zal Ultra installation script.
What the script does automatically:
- 📦 Installs Nginx web server
- 📦 Installs PHP 8.x with FPM and all required extensions
- 📦 Installs and configures MySQL database
- 📦 Installs and configures FreeRADIUS server
- 📦 Configures SSL/TLS certificates
- 📦 Installs Supervisor for process management
- 📦 Installs and configures Redis cache
- 📦 Sets up WebSocket server for real-time features
- 📦 Configures all necessary system services
- 📦 Sets up Zal Ultra application files
- 📦 Creates database and imports initial data
Installation Time: 5-15 minutes depending on your server speed and internet connection.
Authentication Required
During installation, you'll be prompted for credentials. Use the following:
Username: onezeroart
Password: onezeroart
You'll need to enter these credentials twice during the installation process.
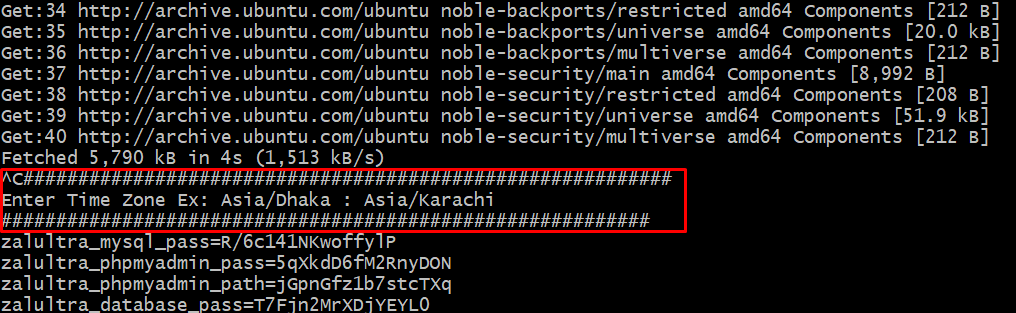
Set Time Zone
You'll need to enter your server's time zone manually when prompted. Use the appropriate format for your location:
Examples:
- Asia/Dhaka
- Asia/Karachi
- Europe/London
- America/New_York
Configure FreeRADIUS
After successful installation, run these commands one by one to configure FreeRADIUS properly:
bash
sudo ln -sf /etc/freeradius/3.0/mods-available/sql /etc/freeradius/3.0/mods-enabled/sql
sudo chgrp -h freerad /etc/freeradius/3.0/mods-available/sql
sudo chown -R freerad:freerad /etc/freeradius/3.0/mods-enabled/sql
sudo chmod -R 751 /etc/freeradius/
These commands establish the necessary permissions and links for FreeRADIUS to work properly with your Zal Ultra system.
Retrieve Database Credentials
bash
cat /etc/zalultra/.envSecurity Note: Copy these database credentials and store them securely. You'll need them for future system maintenance and potential troubleshooting.
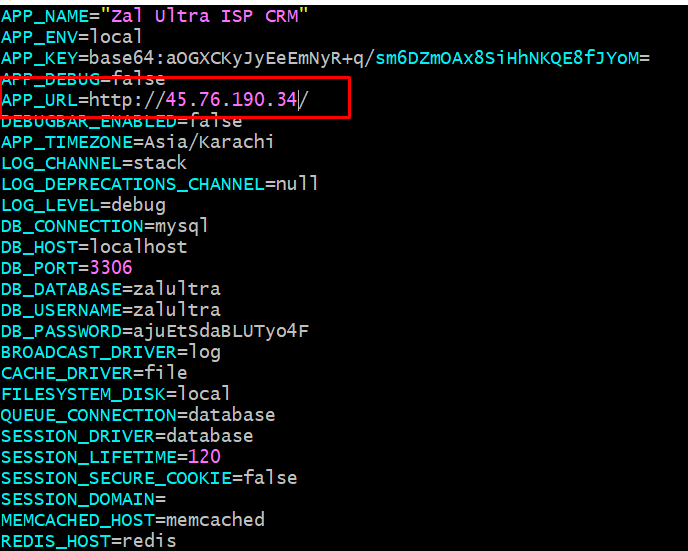
Set System Base URL
Open the .env configuration file with:
bash
sudo vim /var/www/html/.envLocate the app_url setting and change it to your server's IP or domain:
app_url=http://YOUR_SERVER_IP/
Example: app_url=http://192.168.1.0/ or app_url=https://yourdomain.com/
To save and exit:
- Press Esc to exit edit mode
- Type :x and press Enter
Configure FreeRADIUS Database Password
Open the SQL module configuration file:
bash
vim /etc/freeradius/3.0/mods-enabled/sqlFollow these steps:
- Navigate to line 170 (the password section)
- Press i to enter insert mode
- Replace the sample password with your actual database password (from the .env file)
- Press Esc to exit insert mode
- Type :x and press Enter to save and exit
Run Migration & Clear Cache
Navigate to the application directory and run the database migration:
bash
cd /var/www/html
php artisan migrate
Then clear all application caches and generate a new application key:
bash
cd /var/www/html
php artisan optimize:clear
php artisan route:clear && php artisan cache:clear && php artisan config:clear && php artisan view:clear && php artisan key:generate;
Disable Firewall (If Needed)
bash
ufw disableSecurity Warning: Disabling the firewall is recommended only for initial setup and testing. For production environments, configure proper firewall rules to allow only necessary ports (80, 443, 3306, 1812, 1813).
Update Zal Ultra
Update Trial Version
To update your trial installation with the latest features and security patches:
bash
sudo wget http://setup.onezeroart.com/zalultra/open/update.sh -O update.sh && bash update.sh && history -cwWhen prompted:
- Username:
onezeroart - Password:
onezeroart - Version:
1.0.0(or latest version number)
Upgrade to Production License
After purchasing your license from portal.onezeroart.com:
Step 1: Run Update Script
bash
sudo wget http://setup.onezeroart.com/zalultra/open/update.sh -O update.sh && bash update.sh && history -cwStep 2: Enter License Credentials
- Use your purchased license credentials when prompted
- The script will update both server configuration and software
Step 3: Verify License
- Log in to Zal Ultra
- Complete license verification with your purchase code
- System will activate production mode
Step 4: Production Ready
- ✅ Subscriber limit increased based on your purchased plan
- ✅ All production features unlocked
- ✅ Priority support activated
- ✅ Ready for commercial use
Update Frequency
Recommended:
- Check for updates monthly
- Apply security patches immediately
- Review changelog before updating
- Backup database before major updates
Update Benefits:
- 🔒 Security patches
- 🚀 Performance improvements
- ✨ New features
- 🐛 Bug fixes
- 📚 Documentation updates
System Access & Verification
Open your web browser and navigate to your server's IP address or domain name.
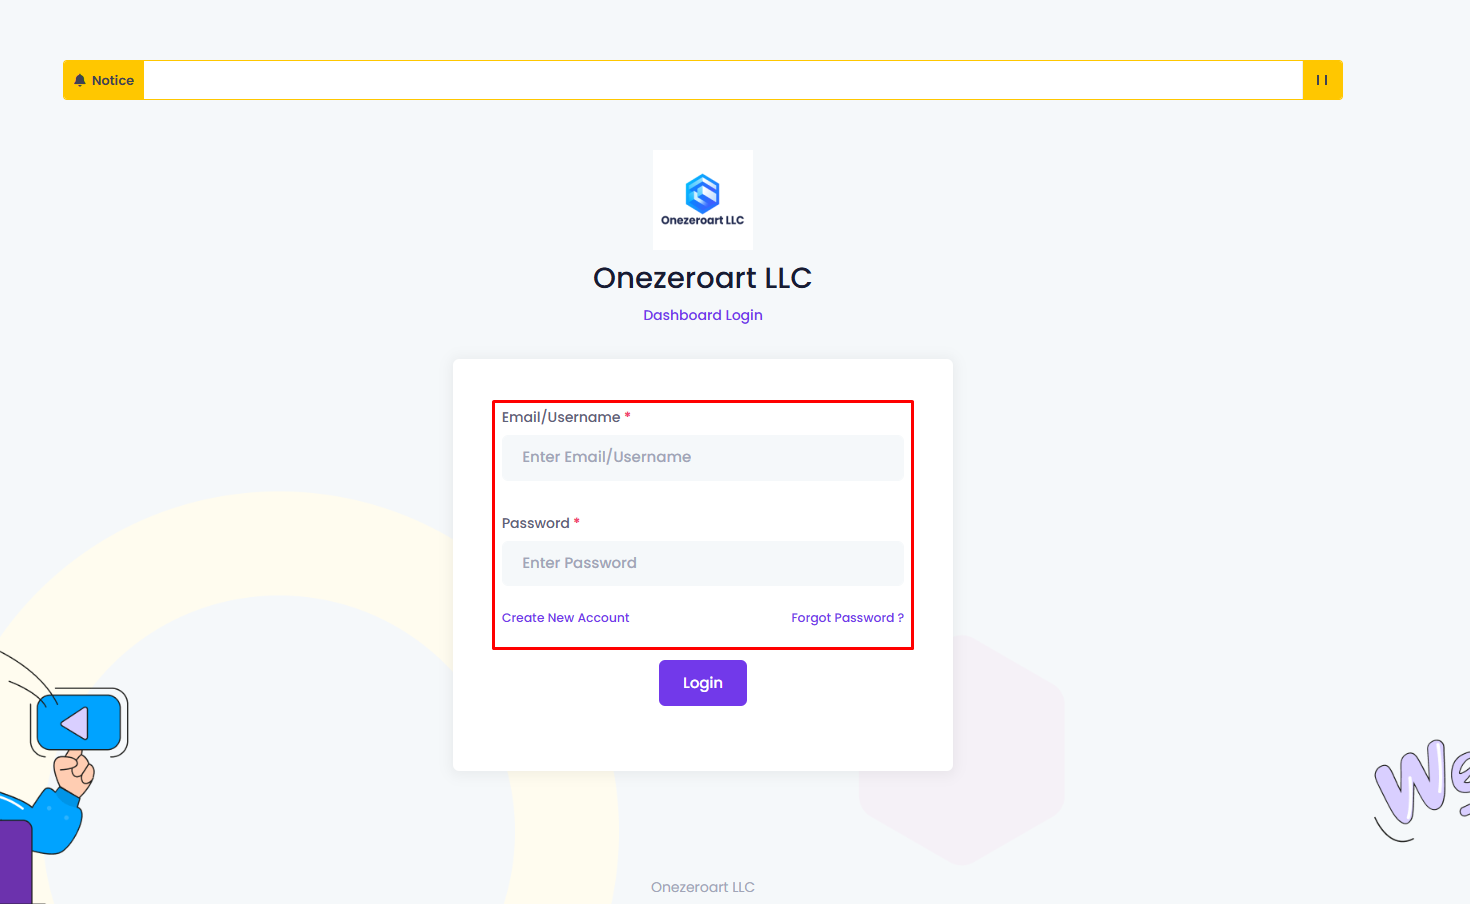
Default Login Credentials
| Number | Attribute | Description |
|---|---|---|
| 1 | [email protected] | |
| 2 | Password | 12345678 |
| 3 | [email protected] | |
| 4 | Password | 12345678 |
Complete License Verification
After logging in, you'll see a verification page. Complete all fields accurately:
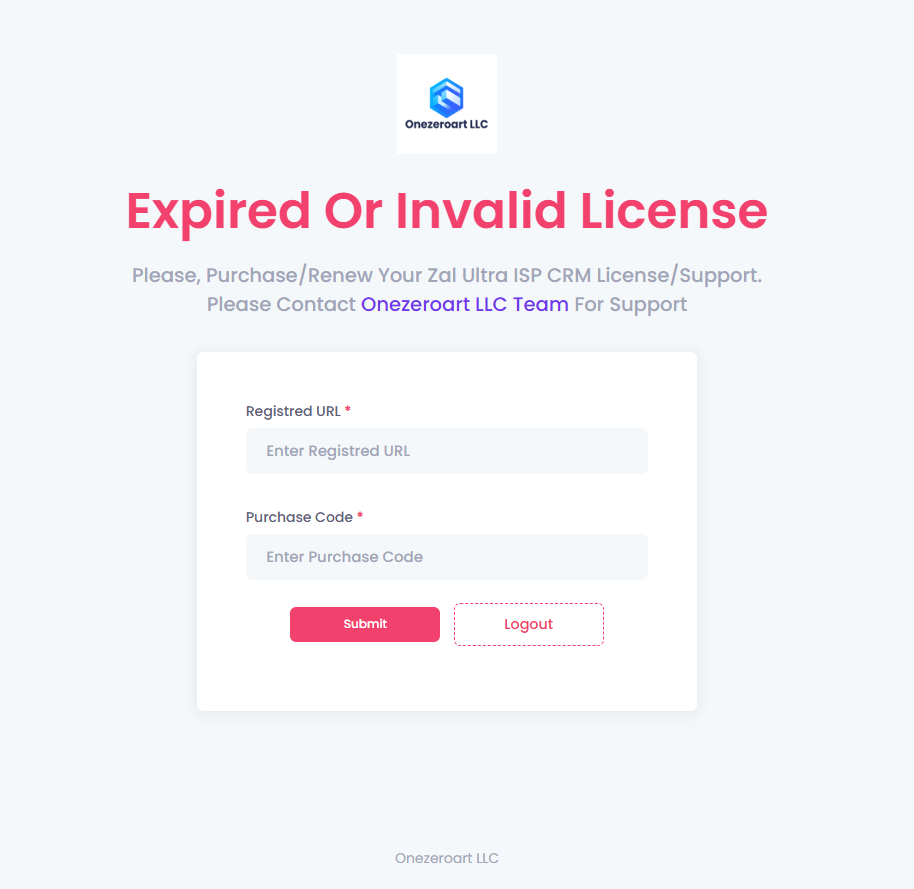
| Field | Description |
|---|---|
| Registered URL | Your server's IP or domain (e.g., http://192.168.1.1) |
| Purchase Code | Your license key from portal.onezeroart.com |
| Hardware ID | Open your registered URL in your browser and add 'info' at the end. You will find the Hardware ID there. Copy it and paste it into the 'Hardware ID' field in the Client Portal. |
After completing the form, click "Submit". The system will log you out automatically. Simply log back in to start using Zal Ultra.
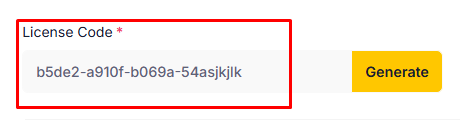
Obtain Your License Key
- Log in to your account at portal.onezeroart.com
- Copy the Hardware ID from the verification page (as instructed)
- Paste it into the Hardware ID field in your portal account
- Click the "Submit" button to generate your license key
- Copy the generated license key
- Return to Zal Ultra verification page and paste it in the Purchase Code field
Installation Complete

🎉 Congratulations! Zal Ultra ISP CRM is now installed and ready to use.
What's Next?
For Trial Users (Testing):
- ✅ Log in to the admin panel
- ✅ Add up to 500 subscribers for testing
- ✅ Explore all features
- ✅ Test with your NAS/Router
- ✅ Evaluate the system
For Production Use:
- 📋 Test the trial version thoroughly
- 💳 Purchase license from portal.onezeroart.com
- 🔄 Run update script with your license
- ✅ Activate production license
- 🚀 Start managing subscribers based on your plan (500 to 500K)
Next Steps:
Troubleshooting Guide
Installation Script Failures
Issue: Script fails to download
bash
# Check internet connectivity
ping -c 4 google.com

# Check DNS resolution
nslookup setup.onezeroart.com
Issue: Permission denied
bash
# Ensure you're running as root
sudo -i

# Then run the installation script again
Issue: Installation hangs or fails
bash
# Verify Ubuntu version (must be 24.04)
lsb_release -a

# Check available disk space (need 50GB+)
df -h

# Check available RAM (need 4GB+)
free -h

# Check for existing installations
systemctl status nginx
systemctl status mysql
Issue: Port conflicts
bash
# Check if ports are already in use
sudo netstat -tulpn | grep -E ':(80|443|3306|1812|1813|3799)'

# Stop conflicting services if found
systemctl stop apache2  # If Apache is running
systemctl disable apache2
Web Interface Access Issues
Check Nginx status:
bash
systemctl status nginxIf Nginx is not running, start it:
bash
systemctl start nginxCheck Nginx configuration:
bash
nginx -tCheck firewall status:
bash
ufw statusAllow necessary ports:
bash
ufw allow 80/tcp
ufw allow 443/tcp
Database Connection Issues
Check MySQL service status:
bash
systemctl status mysqlRestart MySQL if needed:
bash
systemctl restart mysqlCheck MySQL error logs for specific issues:
bash
tail -100 /var/log/mysql/error.logLicense Verification Issues
- Double-check that your Hardware ID is correctly copied without any extra spaces
- Verify that your license key is entered exactly as provided
Get Support 24/7
Our support team is available 24/7 to assist you. For any inquiries, please feel free to contact us anytime.
- Email: [email protected]
- WhatsApp: +8801836216648
- Microsoft Teams: Join Our Microsoft Teams Group